Filters
Build Filters
A Filter is a reusable item within Cheetah Digital that uses one or more logical conditions to select specific records from the database. Filters are used throughout Cheetah Digital for a variety of purposes – to define the target audience for a Campaign, to determine what Dynamic Content variant is displayed, to select test records for proofing, or to include records in a Seed List, for example.
Create a filter
1. From the Top Navigation bar, select Data > Execution > Filters.
2. In the Tool Ribbon, click New Filter.
3. Fill out the Filter details:

4. Click Create.
Add a condition using demographic fields
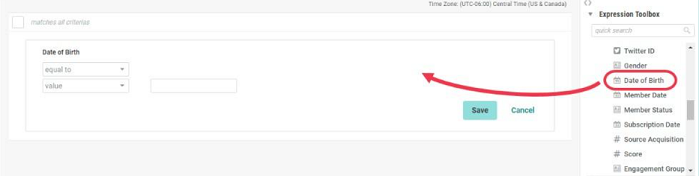
Construct Filter logic using demographic fields from the Filter's source table.
1. In the right-hand pane, expand the Expression Toolbox section.
2. Expand the Fields sub-section.
3. Drag-and-drop the desired demographic field to the canvas.
4. Select the desired operator.
5. Enter or select a value.
6. Click Save in the condition row.
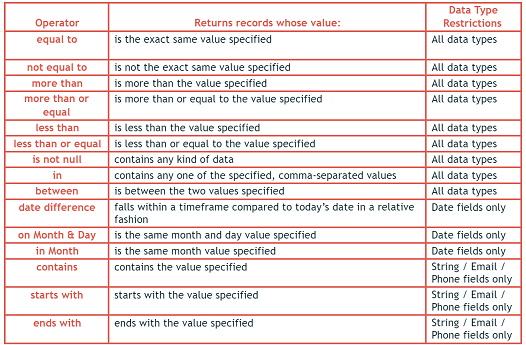
Note: For a list of operators and their descriptions, see Topic 20: Operator options
Add a condition using activities & items
The platform gathers information about recipient actions (opens, clicks, etc.), as well as other events, such as file imports. You can construct Filter logic using any of these actions.
1. In the right-hand pane, expand the Activities & Items section.
2. Drag-and-drop the desired activity type to the canvas.
3. In the Build Criteria pop-up window, select or enter the desired criteria options. The available options vary depending on the activity type.
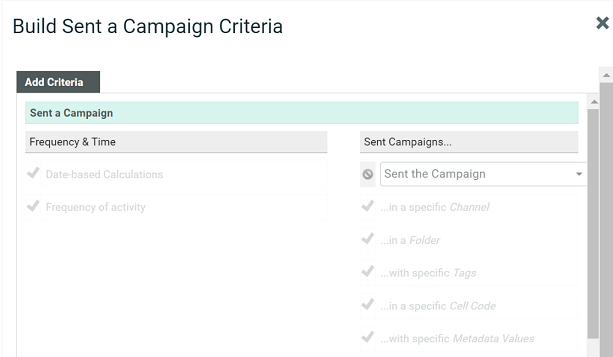
4. Optionally enter a descriptive name for this logical condition in the Filter Name text field.
5. Click Save Criteria.
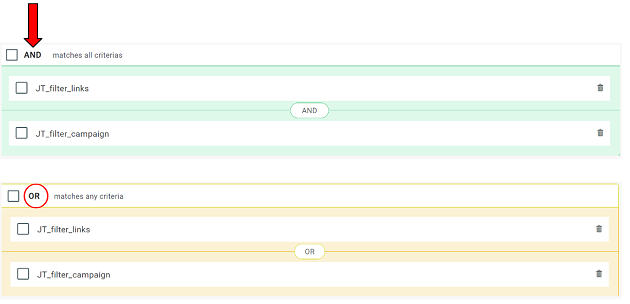
Using logical operators
If your Filter has only one condition, then the system simply finds all the records that match that condition. As soon as you add a second condition, then you need to define the logical relationship between the conditions – either AND (the record must match all conditions) or OR (the record must match at least one of the conditions).
Note: The platform will not let you save or calculate the Filter until you assign a logical operator.
1. Add the conditions to your Filter as described above.
2. By default, the system assigns an AND operator.
3. To toggle to OR, click the "AND" operator.
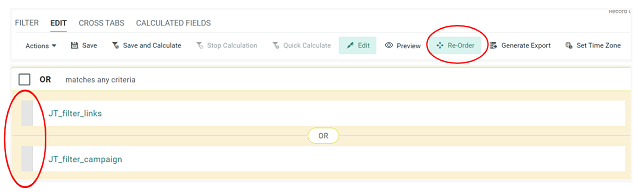
Reorder conditions
Filter logic is processed in a top-down manner, with records selected in the first condition being passed along to the second condition, and so on. Ordering the Filter conditions into an efficient sequence can significantly improve the Filter's performance.
1. In the Tool Ribbon, click Re-Order to enable the re-order function.
2. Click the handle on the left side of the condition and drag it to its new position.
3. Click Re-Order again to disable the re- ordering function.
Edit a condition
Existing conditions can be changed at any time.
1. Click the condition name.
2. Make any necessary revisions to the operator and / or value.
3. In the condition row, click Save.
4. In the Tool Ribbon, click Save to save the entire Filter with the revised condition.
Delete a condition
Existing conditions can be deleted at any time.
1. Click the trash can icon on the right side of the condition row.
2. The system changes the trash can icon to an arrow to indicate that this condition has been marked for deletion. Optionally, to reinstate the condition, click the arrow icon.

3. To confirm the deletion, click Save on the Tool Ribbon.
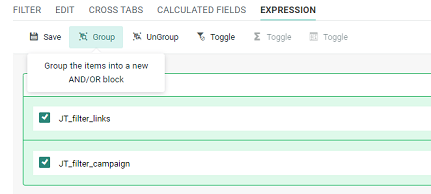
Group conditions
Filter rules can be grouped together to create more complex "nested" logical structures using combinations of AND and OR operators.
1. Click the check marks next to conditions to include in the nested group.
2. In the Tool Ribbon, click Group.
3. The platform creates a nested group with its own logical operator.
4. Within the group, click the box in the upper-left corner to toggle between the AND and OR operators.
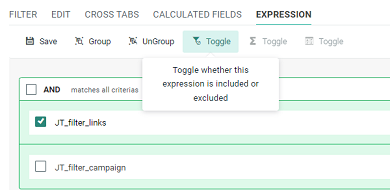
Exclude records
By default, a Filter will include all of the records that match the criteria defined within each condition of the Filter. In some cases, though, you might want to exclude records that match a Filter condition.
1. Click the check mark next to the desired condition.
2. In the Tool Ribbon, click Exclude > Toggle.
3. The system changes the logic to "exclude" for the selected condition. The condition is highlighted in red, with a label "excluded."
Save and calculate a filter
Save and calculate the Filter to run the logic and to provide a count of records selected by the Filter.
1. On the Tool Ribbon, click one of the following:
- Save and Calculate — The standard calculation method, available for every Filter.
- Quick Calculate — This method uses a different query architecture than the standard method, and provides a significant increase in processing speed. However Quick Calculate doesn't support every Filter condition and activity type
Hint: If you add a Filter condition or activity type that's not supported by the Quick Calculate feature, the Quick Calculate button will not be available.
2. A progress bar is displayed in the top-right corner of the workspace.
3. When the Filter is complete, the progress bar is replaced with a final count of records that match your Filter criteria.
View waterfall counts
Waterfall counts provide a detailed view of how many records were selected by each condition in your Filter.
Note: Waterfall counts aren't available if you used the Quick Calculate method.
1. Calculate the Filter using the standard calculation method (see Topic 10: Save and calculate a Filter).
2. Click the View Stats link to toggle on the waterfall counts.
3. Each Filter condition is expanded to show how many records it selected, and were then passed along to the next condition.
4. When finished, click the Hide Stats link to toggle off the waterfall counts.
Preview records
To verify that your Filter is selecting the desired records, you can view (and optionally edit) the details of the selected records.
1. Calculate the Filter (see Topic 10: Save and calculate a Filter).
2. In the Tool Ribbon, click Preview.
3. The system displays a grid, showing all of the records that matched your Filter criteria.
4. To edit a record, click the Edit link next to the desired record. The Record Details screen is displayed and populated within a new tab in the Top Navigation Pane.
5. Make any necessary revisions to this record, then click Save.
Other Filter Features
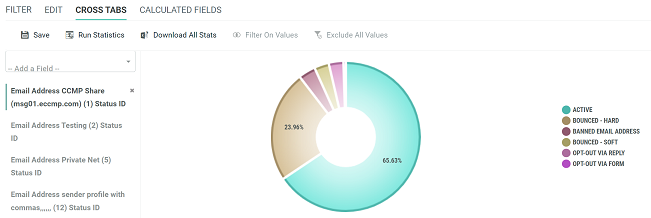
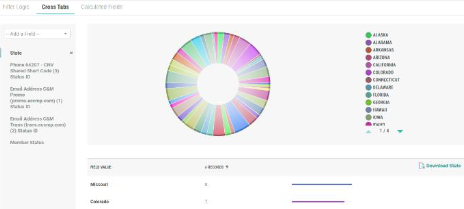
View recipient status using cross tabs
When using a Filter to define a Campaign audience, the number of records selected by the Filter does not necessarily reflect the size of the Campaign audience. The platform automatically suppresses recipients from the audience for various reasons, such as their opt-out status, or invalid email addresses, for example.
The platform uses a Status ID field to control a recipient's opt-in / opt-out status. From the Filter screen, you can view a Cross Tab report that shows the counts in your Filter audience, by Status ID value. This report provides a clearer picture of your actual Campaign audience size, as it tells you how many recipients will be suppressed due to their opt- out status.
1. Define your Filter conditions.
2. From the row of tabs beneath the Tool Ribbon, select Cross Tabs.
3. From the Add a Field drop-down menu, select the desired Status ID field.
4. In the Tool Ribbon, click Run Statistics.
5. The platform calculates the Filter, and displays the Cross Tab report.
6. Click Download Stats to save the metrics to your PC.
Explore data using cross tabs
Further explore your Filter audience through the use of Cross Tabs. Additional statistics can be run to see a distribution of values per field for the records selected in the Filter.
1. Define your Filter conditions.
2. In the left menu, select Cross Tabs.
3. From the Add a Field drop-down menu, select the desired demographic field
4. In the Tool Ribbon, click Run Statistics.
5. The platform calculates the Filter, and displays the Cross Tab report.
6. Click Download Stats to save the metrics to your PC.
Nest a filter
Insert an existing Filter inside of another Filter so you don’t have to recreate all of the conditions again.
1. In the right-hand pane, expand the Activities & Items section.
2. Drag-and-drop the Another Filter activity type to the canvas.
3. In the pop-up window, browse to and select the desired Filter.
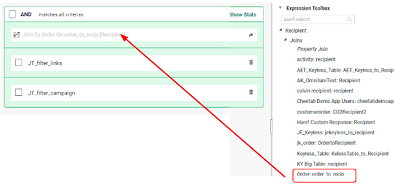
Access fields on joined tables
You can access fields from other tables through existing System Joins.
1. In the right-hand pane, expand the Expression Toolbox section.
2. Expand the Joins section to see a list of all the existing System Joins.
3. Drag-and-drop the join to the canvas.
4. In the Expression Toolbox, scroll down to access the fields in the joined table.
5. Follow the steps in Topic 2 to build your criteria.
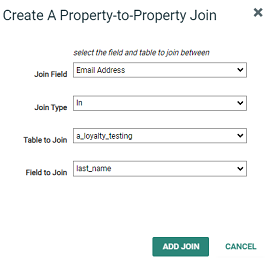
Access fields on other tables
You can access fields from other tables by building ad hoc joins called Property Joins. To create a Property Join, both tables must contain the same field (for example, both tables have an "Email Address" field). When comparing the two joined tables, the system performs a byte-for-byte match on the selected "join field" in each table.
1. In the right-hand pane, expand the Expression Toolbox section.
2. Expand the Joins section.
3. Drag-and-drop Property Join to the canvas.
4. In the pop-up window, configure the Property Join details.
5. In the Expression Toolbox, scroll down to access the fields in the selected table.
6. Follow the steps in Topic 2 to build your criteria.
Send to specific audience sizes
The platform allows you to sort the records in your Filter result set, then select a specified quantity of records off the "top" of that sorted result set. This feature is useful if you want to create a Filter of a specific size.
1. Next to the AND / OR operator, click the check mark.
2. In the Tool Ribbon, click Top and Sort > Toggle.
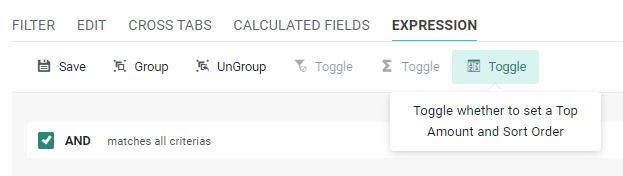
3. In the Top field, enter the desired record quantity that you want this Filter to select.
4. Optionally, from the Order by drop-down menu, select the field by which you want to sort, and select the sort order.
5. Click Apply.
Note: If you don't specify a field on which to sort, the system will default to sorting the records by Primary Key ID, which is essentially sorting the records by the date they were added to the database. By not selecting a sort order, you can create a close equivalent to a random selection.
Use aggregate functions
The platform allows you to perform aggregate functions such as counting or summing a field to make a decision on what records to select. Aggregate Functions can be applied only on fields joined to the Filter's source table via a System Join (not via a Property Join).
Note: You can't aggregate on tables two or more joins away from the Filter's source table.
1. Add a System Join to your Filter as described in Topic 16: Access fields on joined tables.
2. Click the check mark next to the header bar for the System Join.
3. In the Tool Ribbon, click Aggregate > Toggle.
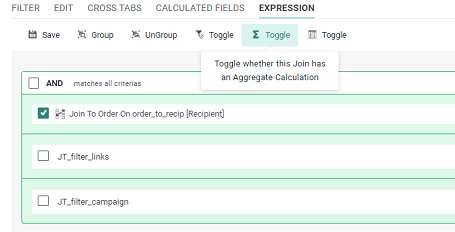
4. From the Select a Function drop-down menu, select the desired mathematical operation: Sum, Count, Average, Minimum, or Maximum.
5. Select a mathematical operator.
6. From the Select a Field drop-down menu, select the desired field on the joined table.
Note: Aggregate functions can be applied only to integer, date, and money / decimal field data types.
7. Enter a value.
8. Click Apply.
Operator options
Within each condition, the selected operator determines the relationship between the field and the indicated value. The available operators vary based on the field's data type.